文件名称:
SpringMVC的Demo与@EnableWebMvc注解.md
所在目录:
docs / Spring全家桶 / SpringMVC源码分析
文件大小:
20.48 KB
下载地址:
文本预览:
### 1\. demo 准备
为了更好地分析 springmvc 相关源码,我们需要先准备一个 springmvc 的 demo,这里的 demo 还是放在 `spring-learn` 模块。
#### 1\. 引入 tomcat 包
在 tomcat 8 之后,tomcat 提供了独立的运行包,需要时直接引入相关依赖就可以了,对应的 gradle 依赖如下:
```
optional("org.apache.tomcat.embed:tomcat-embed-core")
```
在 spring 项目的 `build.gradle` 中,已经引入了 `tomcat-embed-core-9.0.29.jar`,因此在 `spring-learn` 模块中引入时不用再指定版本。
#### 2\. 准备配置类
```
package org.springframework.learn.mvc.demo01;
import org.springframework.context.annotation.ComponentScan;
import org.springframework.stereotype.Component;
import org.springframework.web.servlet.config.annotation.EnableWebMvc;
@Component
@ComponentScan("org.springframework.learn.mvc.demo01")
@EnableWebMvc
public class MvcConfig {
}
```
配置类为 `MvcConfig`,该类指定了项目的包扫描路径,以及通过 `@EnableWebMvc` 开启 mvc 功能。
#### 3\. 实现 `WebApplicationInitializer`
```
package org.springframework.learn.mvc.demo01;
import org.springframework.web.WebApplicationInitializer;
import org.springframework.web.context.support.AnnotationConfigWebApplicationContext;
import org.springframework.web.servlet.DispatcherServlet;
import javax.servlet.ServletContext;
import javax.servlet.ServletRegistration;
public class MyWebApplicationInitializer implements WebApplicationInitializer {
@Override
public void onStartup(ServletContext servletContext) {
AnnotationConfigWebApplicationContext context = new AnnotationConfigWebApplicationContext();
context.register(MvcConfig.class);
DispatcherServlet servlet = new DispatcherServlet(context);
ServletRegistration.Dynamic registration = servletContext.addServlet("app", servlet);
registration.setLoadOnStartup(1);
registration.addMapping("/*");
}
}
```
spring 提供了一个接口 ——`WebApplicationInitializer`,实现该接口时,我们在 `onStartup(...)` 方法中创建 spring 的 `applicationContext`,然后往 servelet 中注册 `DispatcherServlet`。
#### 4\. 准备 controller
```
package org.springframework.learn.mvc.demo01;
import org.springframework.web.bind.annotation.RequestMapping;
import org.springframework.web.bind.annotation.RestController;
@RestController
@RequestMapping("/test")
public class TestController {
@RequestMapping("/hello")
public String hello() {
System.out.println("hello!!!");
return "hello world!";
}
}
```
这里准备了一个简单的 controller,返回一个字符串 "hello world".
#### 5\. 主类
接下来就是主类了:
```
package org.springframework.learn.mvc.demo01;
import org.apache.catalina.Context;
import org.apache.catalina.LifecycleListener;
import org.apache.catalina.connector.Connector;
import org.apache.catalina.startup.Tomcat;
public class MvcDemo01Main {
public static void main(String[] args) throws Exception {
Tomcat tomcat = new Tomcat();
Connector connector = new Connector();
connector.setPort(8080);
connector.setURIEncoding("UTF-8");
tomcat.getService().addConnector(connector);
Context context = tomcat.addContext("", System.getProperty("java.io.tmpdir"));
LifecycleListener lifecycleListener = (LifecycleListener)
Class.forName(tomcat.getHost().getConfigClass())
.getDeclaredConstructor().newInstance();
context.addLifecycleListener(lifecycleListener);
tomcat.start();
tomcat.getServer().await();
}
}
```
在 `main` 方法中,主要处理 tomcat 启动逻辑。
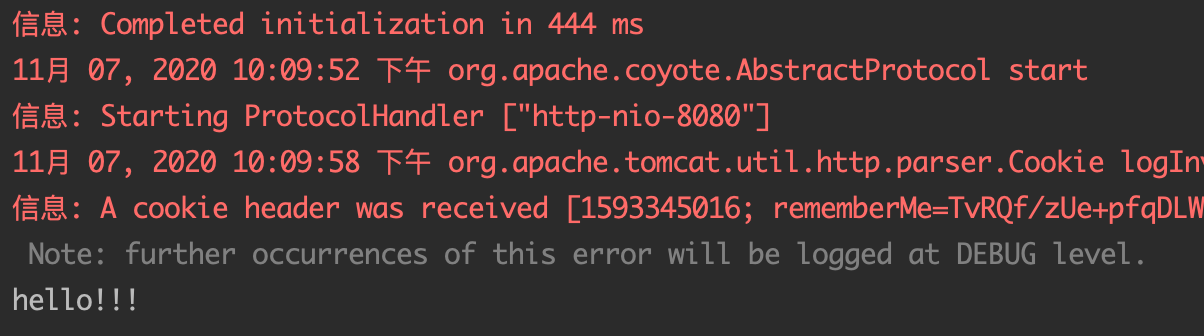
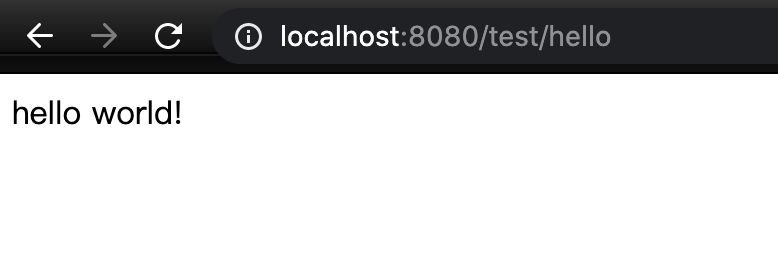
运行,结果如下:
控制台:
页面返回:
可以看到,一个简单的 springmvc 项目就搭建完成了。
### 2. `servlet 3.0` 规范介绍
回忆下古老的 springmvc 项目,一般有这几个 xml 配置文件:
* `web.xml`;servlet 配置文件,配置 web 启动时的操作,以及 `servlet`/`listener`/`filter`;
* `spring.xml`:spring 容器的配置文件,主要用来配置 spring bean.
* `spring-mvc.xml`:springmvc 配置文件,用来配置 mvc 相关的 bean,如文件上传相关的 bean,视图解析 bean,controller 包路径等。
项目在启动时,会先加载 `web.xml`,在 `web.xml` 中加载 spring 相关配置,启动 spring 容器。
在上面的 demo 中,我们发现并 没有这些配置,甚至连 `web.xml` 文件都没有!那么,上面的 web 项目是怎么启动的呢?
在 `servlet` 在 `3.0` 之后,提供了一个 spi 规范,spring 对其实现如下:
1. 在 `spring-web` 模块的 `/src/main/resources/META-INF/services/` 文件夹下,创建文件 `javax.servlet.ServletContainerInitializer`,内容如下
```
org.springframework.web.SpringServletContainerInitializer
```
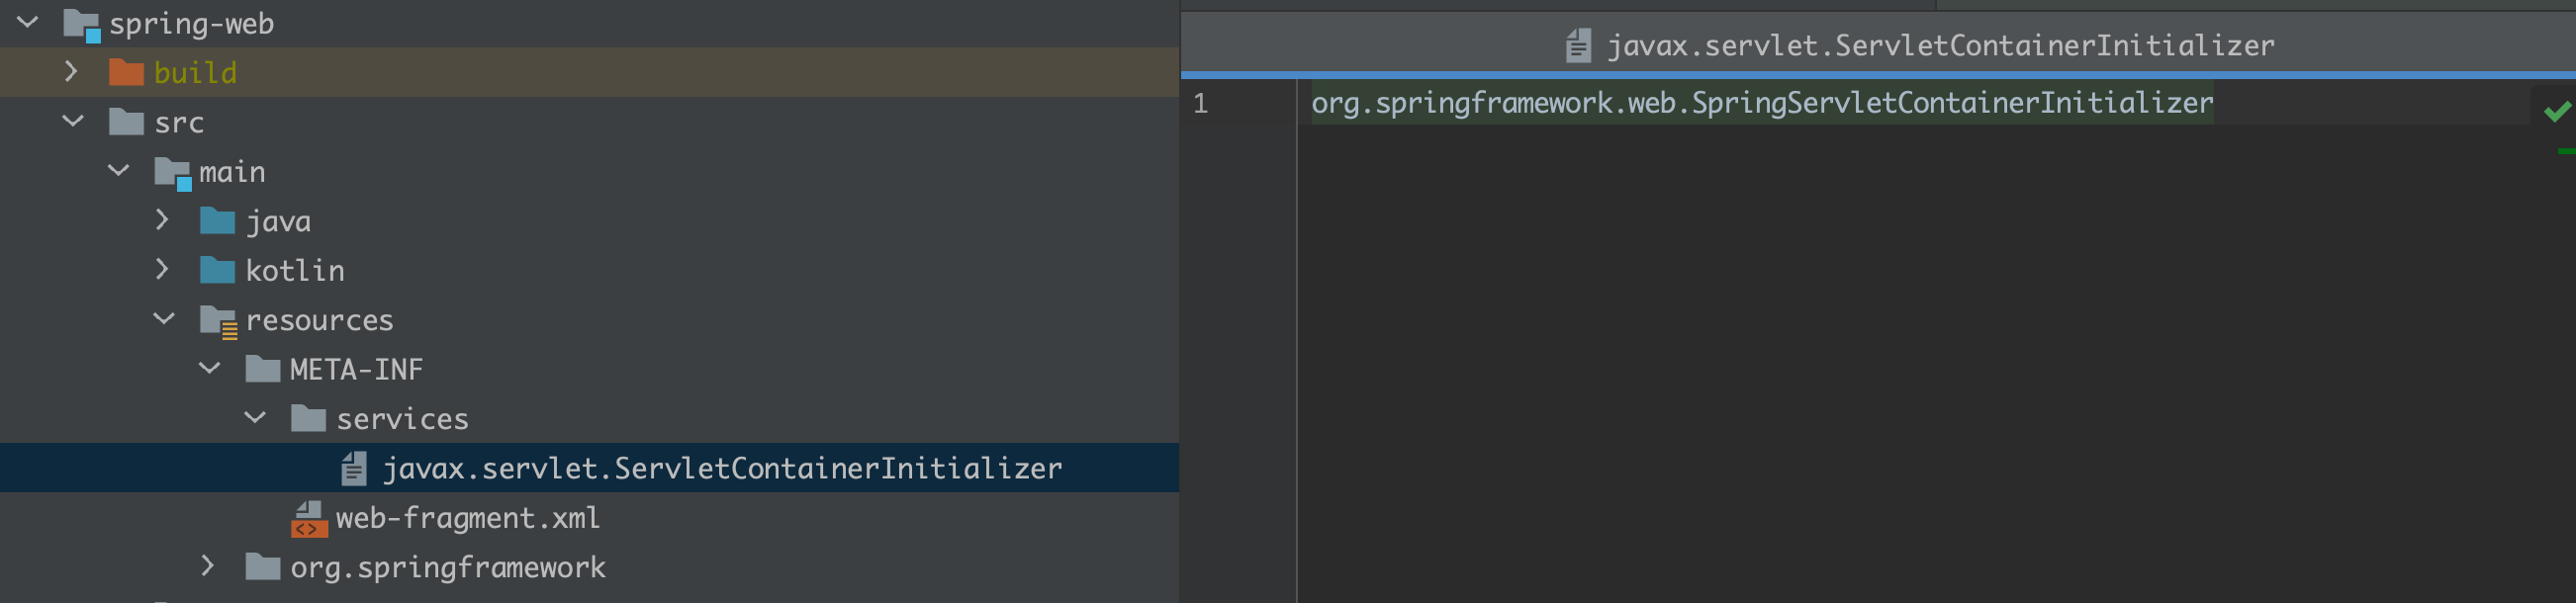
1. `org.springframework.web.SpringServletContainerInitializer` 实现了 servlet 规范:
```
// @HandlesTypes 注解来自于servlet规范,表示 webAppInitializerClass 为 WebApplicationInitializer.class
@HandlesTypes(WebApplicationInitializer.class)
public class SpringServletContainerInitializer implements ServletContainerInitializer {
/*
* 重写 ServletContainerInitializer 的 onStartup 方法
* 在这个方法里,主要是实例化 spring 提供的 WebApplicationInitializer.class,然后执行其 onStartup 方法
*
* Set> webAppInitializerClasses 中的类型为 WebApplicationInitializer.class,
* 这个类型由 @HandlesTypes 注解指定
*/
@Override
public void onStartup(@Nullable Set> webAppInitializerClasses, ServletContext servletContext)
throws ServletException {
List initializers = new LinkedList<>();
if (webAppInitializerClasses != null) {
for (Class waiClass : webAppInitializerClasses) {
if (!waiClass.isInterface() && !Modifier.isAbstract(waiClass.getModifiers()) &&
WebApplicationInitializer.class.isAssignableFrom(waiClass)) {
try {
// 使用反射实例化 WebApplicationInitializer 的实现类,添加到 initializers 中
initializers.add((WebApplicationInitializer)
ReflectionUtils.accessibleConstructor(waiClass).newInstance());
}
catch (Throwable ex) {
...
}
}
}
}
servletContext.log(initializers.size() + " ...");
// 排序,实现了Orderd接口,标注 @Order 注解,或实现了 PriorityOrderd 接口
AnnotationAwareOrderComparator.sort(initializers);
for (WebApplicationInitializer initializer : initializers) {
// 调用 WebApplicationInitializer 实现类的onStartup方法
initializer.onStartup(servletContext);
}
}
}
```
1. `WebApplicationInitializer` 的实现 我们来看看 demo 中对 `WebApplicationInitializer` 的实现:
```
package org.springframework.learn.mvc.demo01;
import org.springframework.web.WebApplicationInitializer;
import org.springframework.web.context.support.AnnotationConfigWebApplicationContext;
import org.springframework.web.servlet.DispatcherServlet;
import javax.servlet.ServletContext;
import javax.servlet.ServletRegistration;
public class MyWebApplicationInitializer implements WebApplicationInitializer {
/*
* 在这里启动 spring 项目
*/
@Override
public void onStartup(ServletContext servletContext) {
// 创建 spring 的 ApplicationContext
AnnotationConfigWebApplicationContext context = new AnnotationConfigWebApplicationContext();
context.register(MvcConfig.class);
// 添加 DispatcherServlet 到 servlet 中
DispatcherServlet servlet = new DispatcherServlet(context);
ServletRegistration.Dynamic registration = servletContext.addServlet("app", servlet);
registration.setLoadOnStartup(1);
registration.addMapping("/*");
}
}
```
最终执行过程如下:

由此,spring 容器就启动了。
### 3\. @EnableWebMvc 作用
在 demo 中,我们通过 `@EnableWebMvc` 来启动 mvc 功能,那么这个注解做了什么呢?我们进入 `EnableWebMvc` 类:
```
@Retention(RetentionPolicy.RUNTIME)
@Target(ElementType.TYPE)
@Documented
@Import(DelegatingWebMvcConfiguration.class)
public @interface EnableWebMvc {
}
```
可以看到,这个注解通过 `@Import` 注解引入了 `DelegatingWebMvcConfiguration.class`,我们再来看看 `DelegatingWebMvcConfiguration`:
```
@Configuration(proxyBeanMethods = false)
public class DelegatingWebMvcConfiguration extends WebMvcConfigurationSupport {
...
}
```
这个类标有 `@Configuration` 注解,表明这是个配置类,这个类继承的是 `WebMvcConfigurationSupport`,从名字来看,`WebMvcConfigurationSupport` 为 "mvc 配置支持",这表明这个类是用来置处理 mvc 相关的配置的。
为了更好地分析,这里先介绍几个类:
1. `DelegatingWebMvcConfiguration`:由 `@EnableWebMvc` 引入的类,是 `WebMvcConfigurationSupport` 的子类,重写了 `WebMvcConfigurationSupport` 提供的配置方法:
```
/*
* @Configuration:表明这是个配置类
* extends WebMvcConfigurationSupport:继承了WebMvcConfigurationSupport类
*/
@Configuration(proxyBeanMethods = false)
public class DelegatingWebMvcConfiguration extends WebMvcConfigurationSupport {
// WebMvcConfigurerComposite 是 WebMvcConfigurer 的组合,下面会提到
private final WebMvcConfigurerComposite configurers = new WebMvcConfigurerComposite();
/**
* 设置configurers
* 添加了@Autowired注解,表示将spring容器中的所有WebMvcConfigurer bean 作为
* 参数configurers的值 ,然后调用该方法
*/
@Autowired(required = false)
public void setConfigurers(List configurers) {
if (!CollectionUtils.isEmpty(configurers)) {
this.configurers.addWebMvcConfigurers(configurers);
}
}
/**
* 配置PathMatch
*/
@Override
protected void configurePathMatch(PathMatchConfigurer configurer) {
// 调用 WebMvcConfigurerComposite 的方法进行配置
this.configurers.configurePathMatch(configurer);
}
// 其他配置方法也是调用 WebMvcConfigurerComposite 对应的方法进行配置的
...
}
```
2. `WebMvcConfigurerComposite`:`WebMvcConfigurer` 的组合:
```
/**
* 实现了 WebMvcConfigurer
*/
class WebMvcConfigurerComposite implements WebMvcConfigurer {
// delegates属性为 WebMvcConfigurer 的集合
private final List delegates = new ArrayList<>();
/*
* 被DelegatingWebMvcConfiguration#setConfigurers调用
* 最终是把传入的configurers添加到delegates(也就是WebMvcConfigurer集合)中
*/
public void addWebMvcConfigurers(List configurers) {
if (!CollectionUtils.isEmpty(configurers)) {
this.delegates.addAll(configurers);
}
}
/**
* 配置时,会遍历delegates(也就是WebMvcConfigurer集合),将传入的配置设置到
* 集合中的每一个WebMvcConfigurer
*/
@Override
public void configurePathMatch(PathMatchConfigurer configurer) {
for (WebMvcConfigurer delegate : this.delegates) {
delegate.configurePathMatch(configurer);
}
}
// 其他配置类似,省略
...
}
```
3. `WebMvcConfigurer`:springmvc 的配置接口,提供了非常多的配置
```
public interface WebMvcConfigurer {
default void configurePathMatch(PathMatchConfigurer configurer) {
}
default void configureContentNegotiation(ContentNegotiationConfigurer configurer) {
}
default void configureAsyncSupport(AsyncSupportConfigurer configurer) {
}
...
}
```
4. `WebMvcConfigurationSupport`:springmvc 的配置支持类
```
/**
* 实现了两个aware接口
*/
public class WebMvcConfigurationSupport implements ApplicationContextAware, ServletContextAware {
//================= 来自 XxxAware 接口的方法 =================
@Override
public void setApplicationContext(@Nullable ApplicationContext applicationContext) {
this.applicationContext = applicationContext;
}
@Override
public void setServletContext(@Nullable ServletContext servletContext) {
this.servletContext = servletContext;
}
//================= @Bean 方法,向spring中添加 bean =================
@Bean
public RequestMappingHandlerMapping requestMappingHandlerMapping(...) {
RequestMappingHandlerMapping mapping = createRequestMappingHandlerMapping();
mapping.setOrder(0);
// getInterceptors(...) 获取 interceptors,往下看
mapping.setInterceptors(getInterceptors(conversionService, resourceUrlProvider));
mapping.setContentNegotiationManager(contentNegotiationManager);
// getCorsConfigurations(...) 获取Cors配置,往下看
mapping.setCorsConfigurations(getCorsConfigurations());
// getPathMatchConfigurer(...) 获取PathMatch配置,往下看
PathMatchConfigurer configurer = getPathMatchConfigurer();
...
return mapping;
}
...
//================= get xxx 配置方法,添加spring提供的默认配置,添加自定义配置 =======
// 获取 interceptors
protected final Object[] getInterceptors(
FormattingConversionService mvcConversionService,
ResourceUrlProvider mvcResourceUrlProvider) {
if (this.interceptors == null) {
InterceptorRegistry registry = new InterceptorRegistry();
// 调用配置方法,添加 interceptor,往下看
addInterceptors(registry);
registry.addInterceptor(new ConversionServiceExposingInterceptor(mvcConversionService));
registry.addInterceptor(new ResourceUrlProviderExposingInterceptor(mvcResourceUrlProvider));
this.interceptors = registry.getInterceptors();
}
return this.interceptors.toArray();
}
// 获取Cors配置
protected final Map getCorsConfigurations() {
if (this.corsConfigurations == null) {
CorsRegistry registry = new CorsRegistry();
// 调用配置方法,添加 CorsMapping,往下看
addCorsMappings(registry);
this.corsConfigurations = registry.getCorsConfigurations();
}
return this.corsConfigurations;
}
// 获取PathMatch配置
protected PathMatchConfigurer getPathMatchConfigurer() {
if (this.pathMatchConfigurer == null) {
this.pathMatchConfigurer = new PathMatchConfigurer();
configurePathMatch(this.pathMatchConfigurer);
}
return this.pathMatchConfigurer;
}
...
//================= 配置方法,留待子类实现 =================
// 添加自定义 Interceptor,待子类实现
protected void addInterceptors(InterceptorRegistry registry) {
}
// 添加自定义 CorsMapping,待子类实现
protected void addCorsMappings(CorsRegistry registry) {
}
// 配置自定义 PathMatch
protected void configurePathMatch(PathMatchConfigurer configurer) {
}
...
}
```
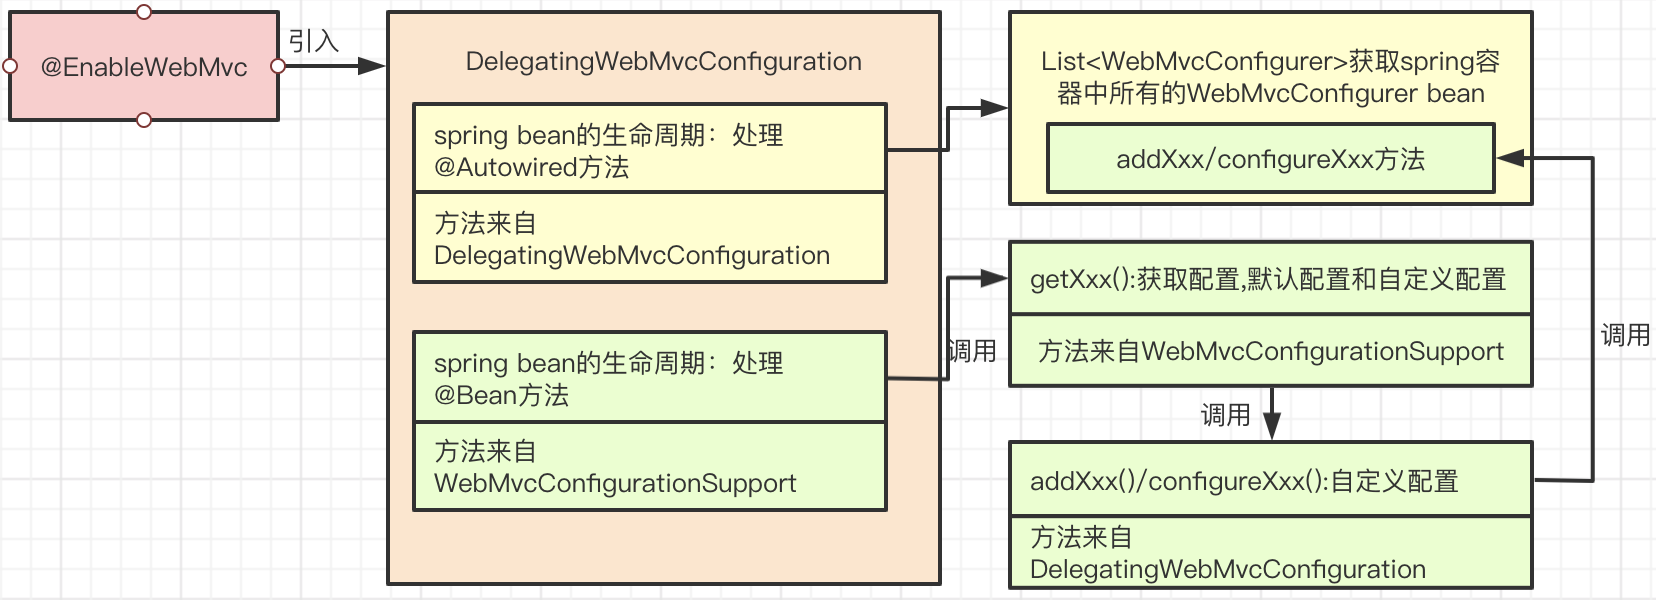
可以看到,这个类的方法分为四类:
* 来自 `XxxAware` 的方法:`XxxAware` 接口由 spring 提供,bean 初始化完成时处理回调;
* 有 `@Bean` 注解的方法:往 spring 中添加 bean,生成 bean 时会调用 `getXxx` 方法;
* `getXxx` 方法:获取配置方法,在该方法中,会添加 spring 提供的默认配置,以及调用 `addXxx/configureXxx` 方法添加自定义配置;
* `addXxx/configureXxx` 方法:由子类实现,可以向 springmvc 中添加自定义配置。
这里总结下这 4 个类的关系:
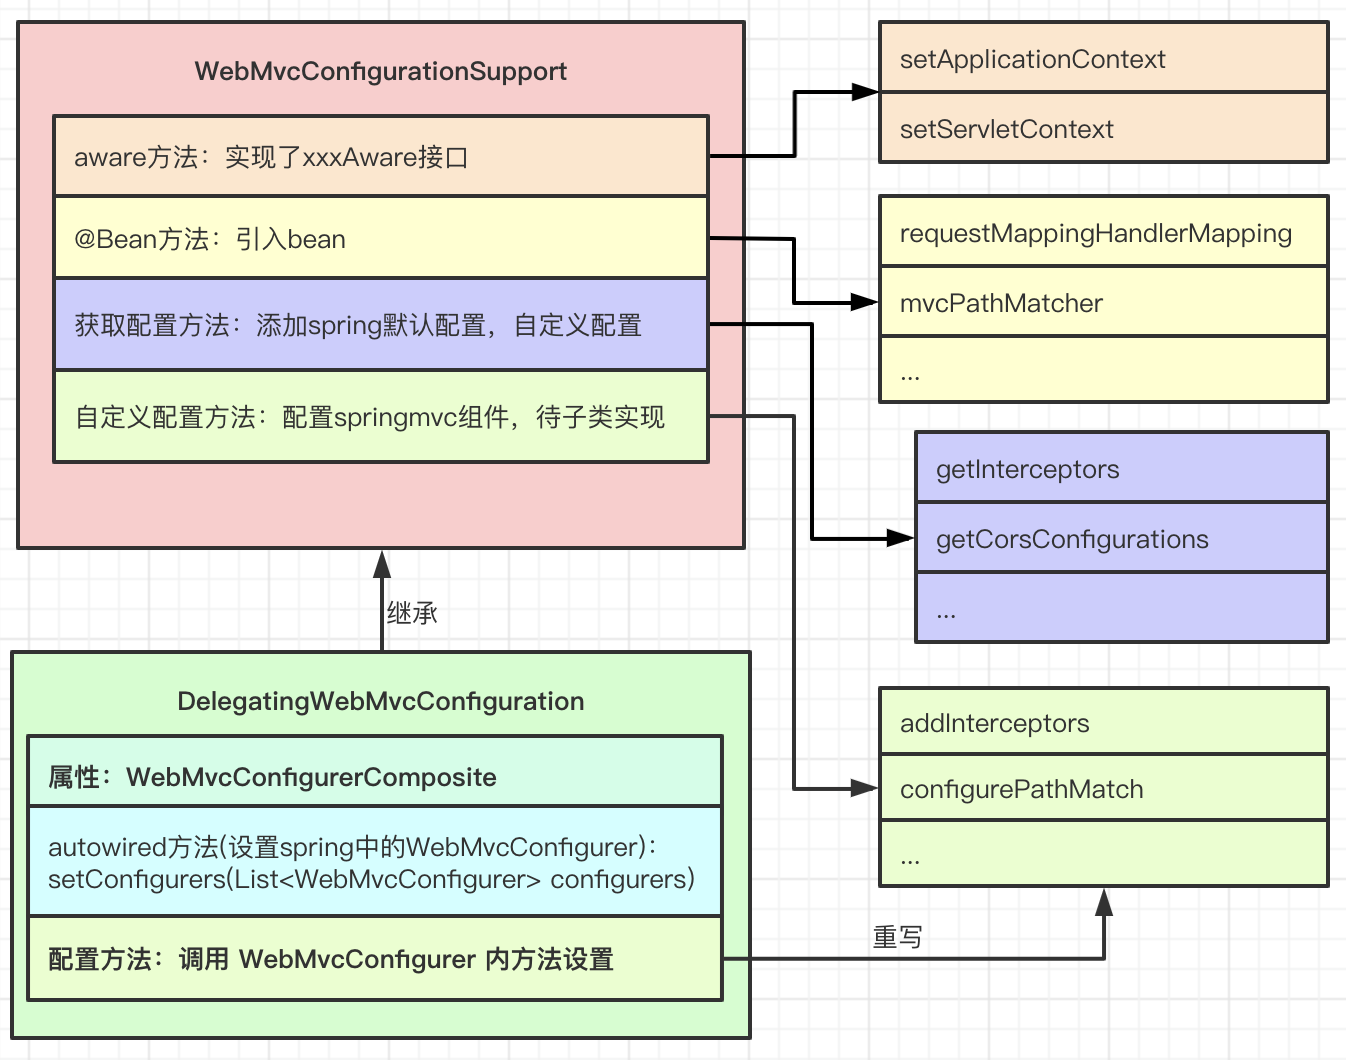
理清了这四个类的关系,`@EnableWebMvc` 的执行流程就一目了然了,这里总结如下:
1. `@EnableWebMvc` 向 spring 容器中引入了` DelegatingWebMvcConfiguration`;
2. `DelegatingWebMvcConfiguration` 中有包含 `@Autowired` 注解的方法 `setConfigurers(List)`,在 spring bean 的周期中会对其执行,作用为获取容器中所有 `WebMvcConfigurer` 的 bean 将其设置到` DelegatingWebMvcConfiguration` 的属性中;
3. `DelegatingWebMvcConfiguration` 继承了 `WebMvcConfigurationSupport`,在 spring bean 的周期中会处理 `WebMvcConfigurationSupport` 中有 `@Bean` 注解的方法,这种方法比较多,如 `requestMappingHandlerMapping()`、`mvcPathMatcher` 等,这些都是 smvc 的功能组件;
4. 在处理 `WebMvcConfigurationSupport` 中有 `@Bean` 注解的方法时,会调用 `getXxx()` 获取相关配置,该配置包括 spring 提供的默认配置及自定义配置,`getXxx()` 由 `WebMvcConfigurationSupport` 提供;
5. 在调用 `WebMvcConfigurationSupport#getXxx()` 获取自定义配置时,会调用 `addXxx()/configureXxx()`,该方法在 `WebMvcConfigurationSupport` 中是空方法,具体休逻辑由子类 (也就是` DelegatingWebMvcConfiguration`) 提供,最终调用方式是**遍历执行第 2 步获取的 `WebMvcConfigurer` 的 `addXxx()/configureXxx()`**;
整个流程如下图所示:
在启用 springmvc 功能,并添加自定义配置时,我们可以这么做:
1. 方式 1:使用 @EnableWebMvc 注解启用 mvc 功能,实现 WebMvcConfigurer,添加自定义配置
```
// 使用@EnableWebMvc注解启用mvc功能
@Component
@EnableWebMvc
public class MvcConfig {
...
}
// 实现 WebMvcConfigurer,添加自定义配置
@Component
public class MyWebMvcConfigurer implements WebMvcConfigurer {
// 重写WebMvcConfigurer方法,处理自定义配置
}
```
2. 方式 2:实现 `WebMvcConfigurationSupport` 类,重写其中的配置方法
```
@Component
public class MyWebMvcConfigurationSupport extends WebMvcConfigurationSupport {
// 重写配置方法,处理自定义配置
}
```
不过采用这种方式后,再实现 `WebMvcConfigurer` 添加自定义配置就不生效了,自定义配置只能在 `WebMvcConfigurationSupport` 进行配置。
springmvc 提供了哪些配置项呢?我们来看看 `WebMvcConfigurer` 提供的方法:
* `configurePathMatch`:配置路由请求规则
* `configureContentNegotiation`:内容协商配置
* `configureAsyncSupport`:
* `configureDefaultServletHandling`:默认静态资源处理器
* `addFormatters`:注册自定义转化器
* `addInterceptors`:拦截器配置
* `addResourceHandlers`:资源处理
* `addCorsMappings`:CORS 配置
* `addViewControllers`:视图跳转控制器
* `configureViewResolvers`:配置视图解析
* `addArgumentResolvers`:添加自定义方法参数处理器
* `addReturnValueHandlers`:添加自定义返回结果处理器
* `configureMessageConverters`:配置消息转换器。重载会覆盖默认注册的 `HttpMessageConverter`
* `extendMessageConverters`:配置消息转换器。仅添加一个自定义的 `HttpMessageConverter`.
* `configureHandlerExceptionResolvers`:配置异常转换器
* `extendHandlerExceptionResolvers`:添加异常转化器
* `getValidator`:
* `getMessageCodesResolver`:
如果需要配置相关项,只需要重写相关方法 即可。
最后我们再来看看 `WebMvcConfigurationSupport` 中引入了哪些 Bean,有 `@Bean` 注解的方法如下:
* `public RequestMappingHandlerMapping requestMappingHandlerMapping(...)`
* `public PathMatcher mvcPathMatcher()`
* `public UrlPathHelper mvcUrlPathHelper()`
* `public ContentNegotiationManager mvcContentNegotiationManager()`
* `public HandlerMapping viewControllerHandlerMapping(...)`
* `public BeanNameUrlHandlerMapping beanNameHandlerMapping(...)`
* `public RouterFunctionMapping routerFunctionMapping(...)`
* `public HandlerMapping resourceHandlerMapping(...)`
* `ResourceUrlProvider mvcResourceUrlProvider()`
* `public HandlerMapping defaultServletHandlerMapping()`
* `public RequestMappingHandlerAdapter requestMappingHandlerAdapter(...)`
* `public HandlerFunctionAdapter handlerFunctionAdapter()`
* `public FormattingConversionService mvcConversionService()`
* `public Validator mvcValidator()`
* `public CompositeUriComponentsContributor mvcUriComponentsContributor(...)`
* `public HttpRequestHandlerAdapter httpRequestHandlerAdapter()`
* `public SimpleControllerHandlerAdapter simpleControllerHandlerAdapter()`
* `public HandlerExceptionResolver handlerExceptionResolver(...)`
* `public ViewResolver mvcViewResolver(...)`
* `HandlerMappingIntrospector mvcHandlerMappingIntrospector()`
这些都是 springmvc 中用到的一些组件,具体的具体内容就不展开了。
### 4\. 总结
本文内容比较杂,先提供了一个 springmvc 的 demo,然后介绍了 demo 中 `0 xml` 配置原理 (也就是 `servlet 3.0` 规范),接着介绍了 `@EnableWebMvc` 的功能,着重介绍了 `WebMvcConfigurationSupport` 的作用。
* * *
_本文原文链接:[https://my.oschina.net/funcy/blog/4696657](https://my.oschina.net/funcy/blog/4696657) ,限于作者个人水平,文中难免有错误之处,欢迎指正!原创不易,商业转载请联系作者获得授权,非商业转载请注明出处。_
为了更好地分析 springmvc 相关源码,我们需要先准备一个 springmvc 的 demo,这里的 demo 还是放在 `spring-learn` 模块。
#### 1\. 引入 tomcat 包
在 tomcat 8 之后,tomcat 提供了独立的运行包,需要时直接引入相关依赖就可以了,对应的 gradle 依赖如下:
```
optional("org.apache.tomcat.embed:tomcat-embed-core")
```
在 spring 项目的 `build.gradle` 中,已经引入了 `tomcat-embed-core-9.0.29.jar`,因此在 `spring-learn` 模块中引入时不用再指定版本。
#### 2\. 准备配置类
```
package org.springframework.learn.mvc.demo01;
import org.springframework.context.annotation.ComponentScan;
import org.springframework.stereotype.Component;
import org.springframework.web.servlet.config.annotation.EnableWebMvc;
@Component
@ComponentScan("org.springframework.learn.mvc.demo01")
@EnableWebMvc
public class MvcConfig {
}
```
配置类为 `MvcConfig`,该类指定了项目的包扫描路径,以及通过 `@EnableWebMvc` 开启 mvc 功能。
#### 3\. 实现 `WebApplicationInitializer`
```
package org.springframework.learn.mvc.demo01;
import org.springframework.web.WebApplicationInitializer;
import org.springframework.web.context.support.AnnotationConfigWebApplicationContext;
import org.springframework.web.servlet.DispatcherServlet;
import javax.servlet.ServletContext;
import javax.servlet.ServletRegistration;
public class MyWebApplicationInitializer implements WebApplicationInitializer {
@Override
public void onStartup(ServletContext servletContext) {
AnnotationConfigWebApplicationContext context = new AnnotationConfigWebApplicationContext();
context.register(MvcConfig.class);
DispatcherServlet servlet = new DispatcherServlet(context);
ServletRegistration.Dynamic registration = servletContext.addServlet("app", servlet);
registration.setLoadOnStartup(1);
registration.addMapping("/*");
}
}
```
spring 提供了一个接口 ——`WebApplicationInitializer`,实现该接口时,我们在 `onStartup(...)` 方法中创建 spring 的 `applicationContext`,然后往 servelet 中注册 `DispatcherServlet`。
#### 4\. 准备 controller
```
package org.springframework.learn.mvc.demo01;
import org.springframework.web.bind.annotation.RequestMapping;
import org.springframework.web.bind.annotation.RestController;
@RestController
@RequestMapping("/test")
public class TestController {
@RequestMapping("/hello")
public String hello() {
System.out.println("hello!!!");
return "hello world!";
}
}
```
这里准备了一个简单的 controller,返回一个字符串 "hello world".
#### 5\. 主类
接下来就是主类了:
```
package org.springframework.learn.mvc.demo01;
import org.apache.catalina.Context;
import org.apache.catalina.LifecycleListener;
import org.apache.catalina.connector.Connector;
import org.apache.catalina.startup.Tomcat;
public class MvcDemo01Main {
public static void main(String[] args) throws Exception {
Tomcat tomcat = new Tomcat();
Connector connector = new Connector();
connector.setPort(8080);
connector.setURIEncoding("UTF-8");
tomcat.getService().addConnector(connector);
Context context = tomcat.addContext("", System.getProperty("java.io.tmpdir"));
LifecycleListener lifecycleListener = (LifecycleListener)
Class.forName(tomcat.getHost().getConfigClass())
.getDeclaredConstructor().newInstance();
context.addLifecycleListener(lifecycleListener);
tomcat.start();
tomcat.getServer().await();
}
}
```
在 `main` 方法中,主要处理 tomcat 启动逻辑。
运行,结果如下:
控制台:

页面返回:

可以看到,一个简单的 springmvc 项目就搭建完成了。
### 2. `servlet 3.0` 规范介绍
回忆下古老的 springmvc 项目,一般有这几个 xml 配置文件:
* `web.xml`;servlet 配置文件,配置 web 启动时的操作,以及 `servlet`/`listener`/`filter`;
* `spring.xml`:spring 容器的配置文件,主要用来配置 spring bean.
* `spring-mvc.xml`:springmvc 配置文件,用来配置 mvc 相关的 bean,如文件上传相关的 bean,视图解析 bean,controller 包路径等。
项目在启动时,会先加载 `web.xml`,在 `web.xml` 中加载 spring 相关配置,启动 spring 容器。
在上面的 demo 中,我们发现并 没有这些配置,甚至连 `web.xml` 文件都没有!那么,上面的 web 项目是怎么启动的呢?
在 `servlet` 在 `3.0` 之后,提供了一个 spi 规范,spring 对其实现如下:
1. 在 `spring-web` 模块的 `/src/main/resources/META-INF/services/` 文件夹下,创建文件 `javax.servlet.ServletContainerInitializer`,内容如下
```
org.springframework.web.SpringServletContainerInitializer
```

1. `org.springframework.web.SpringServletContainerInitializer` 实现了 servlet 规范:
```
// @HandlesTypes 注解来自于servlet规范,表示 webAppInitializerClass 为 WebApplicationInitializer.class
@HandlesTypes(WebApplicationInitializer.class)
public class SpringServletContainerInitializer implements ServletContainerInitializer {
/*
* 重写 ServletContainerInitializer 的 onStartup 方法
* 在这个方法里,主要是实例化 spring 提供的 WebApplicationInitializer.class,然后执行其 onStartup 方法
*
* Set
* 这个类型由 @HandlesTypes 注解指定
*/
@Override
public void onStartup(@Nullable Set
throws ServletException {
List
if (webAppInitializerClasses != null) {
for (Class waiClass : webAppInitializerClasses) {
if (!waiClass.isInterface() && !Modifier.isAbstract(waiClass.getModifiers()) &&
WebApplicationInitializer.class.isAssignableFrom(waiClass)) {
try {
// 使用反射实例化 WebApplicationInitializer 的实现类,添加到 initializers 中
initializers.add((WebApplicationInitializer)
ReflectionUtils.accessibleConstructor(waiClass).newInstance());
}
catch (Throwable ex) {
...
}
}
}
}
servletContext.log(initializers.size() + " ...");
// 排序,实现了Orderd接口,标注 @Order 注解,或实现了 PriorityOrderd 接口
AnnotationAwareOrderComparator.sort(initializers);
for (WebApplicationInitializer initializer : initializers) {
// 调用 WebApplicationInitializer 实现类的onStartup方法
initializer.onStartup(servletContext);
}
}
}
```
1. `WebApplicationInitializer` 的实现 我们来看看 demo 中对 `WebApplicationInitializer` 的实现:
```
package org.springframework.learn.mvc.demo01;
import org.springframework.web.WebApplicationInitializer;
import org.springframework.web.context.support.AnnotationConfigWebApplicationContext;
import org.springframework.web.servlet.DispatcherServlet;
import javax.servlet.ServletContext;
import javax.servlet.ServletRegistration;
public class MyWebApplicationInitializer implements WebApplicationInitializer {
/*
* 在这里启动 spring 项目
*/
@Override
public void onStartup(ServletContext servletContext) {
// 创建 spring 的 ApplicationContext
AnnotationConfigWebApplicationContext context = new AnnotationConfigWebApplicationContext();
context.register(MvcConfig.class);
// 添加 DispatcherServlet 到 servlet 中
DispatcherServlet servlet = new DispatcherServlet(context);
ServletRegistration.Dynamic registration = servletContext.addServlet("app", servlet);
registration.setLoadOnStartup(1);
registration.addMapping("/*");
}
}
```
最终执行过程如下:

由此,spring 容器就启动了。
### 3\. @EnableWebMvc 作用
在 demo 中,我们通过 `@EnableWebMvc` 来启动 mvc 功能,那么这个注解做了什么呢?我们进入 `EnableWebMvc` 类:
```
@Retention(RetentionPolicy.RUNTIME)
@Target(ElementType.TYPE)
@Documented
@Import(DelegatingWebMvcConfiguration.class)
public @interface EnableWebMvc {
}
```
可以看到,这个注解通过 `@Import` 注解引入了 `DelegatingWebMvcConfiguration.class`,我们再来看看 `DelegatingWebMvcConfiguration`:
```
@Configuration(proxyBeanMethods = false)
public class DelegatingWebMvcConfiguration extends WebMvcConfigurationSupport {
...
}
```
这个类标有 `@Configuration` 注解,表明这是个配置类,这个类继承的是 `WebMvcConfigurationSupport`,从名字来看,`WebMvcConfigurationSupport` 为 "mvc 配置支持",这表明这个类是用来置处理 mvc 相关的配置的。
为了更好地分析,这里先介绍几个类:
1. `DelegatingWebMvcConfiguration`:由 `@EnableWebMvc` 引入的类,是 `WebMvcConfigurationSupport` 的子类,重写了 `WebMvcConfigurationSupport` 提供的配置方法:
```
/*
* @Configuration:表明这是个配置类
* extends WebMvcConfigurationSupport:继承了WebMvcConfigurationSupport类
*/
@Configuration(proxyBeanMethods = false)
public class DelegatingWebMvcConfiguration extends WebMvcConfigurationSupport {
// WebMvcConfigurerComposite 是 WebMvcConfigurer 的组合,下面会提到
private final WebMvcConfigurerComposite configurers = new WebMvcConfigurerComposite();
/**
* 设置configurers
* 添加了@Autowired注解,表示将spring容器中的所有WebMvcConfigurer bean 作为
* 参数configurers的值 ,然后调用该方法
*/
@Autowired(required = false)
public void setConfigurers(List
if (!CollectionUtils.isEmpty(configurers)) {
this.configurers.addWebMvcConfigurers(configurers);
}
}
/**
* 配置PathMatch
*/
@Override
protected void configurePathMatch(PathMatchConfigurer configurer) {
// 调用 WebMvcConfigurerComposite 的方法进行配置
this.configurers.configurePathMatch(configurer);
}
// 其他配置方法也是调用 WebMvcConfigurerComposite 对应的方法进行配置的
...
}
```
2. `WebMvcConfigurerComposite`:`WebMvcConfigurer` 的组合:
```
/**
* 实现了 WebMvcConfigurer
*/
class WebMvcConfigurerComposite implements WebMvcConfigurer {
// delegates属性为 WebMvcConfigurer 的集合
private final List
/*
* 被DelegatingWebMvcConfiguration#setConfigurers调用
* 最终是把传入的configurers添加到delegates(也就是WebMvcConfigurer集合)中
*/
public void addWebMvcConfigurers(List
if (!CollectionUtils.isEmpty(configurers)) {
this.delegates.addAll(configurers);
}
}
/**
* 配置时,会遍历delegates(也就是WebMvcConfigurer集合),将传入的配置设置到
* 集合中的每一个WebMvcConfigurer
*/
@Override
public void configurePathMatch(PathMatchConfigurer configurer) {
for (WebMvcConfigurer delegate : this.delegates) {
delegate.configurePathMatch(configurer);
}
}
// 其他配置类似,省略
...
}
```
3. `WebMvcConfigurer`:springmvc 的配置接口,提供了非常多的配置
```
public interface WebMvcConfigurer {
default void configurePathMatch(PathMatchConfigurer configurer) {
}
default void configureContentNegotiation(ContentNegotiationConfigurer configurer) {
}
default void configureAsyncSupport(AsyncSupportConfigurer configurer) {
}
...
}
```
4. `WebMvcConfigurationSupport`:springmvc 的配置支持类
```
/**
* 实现了两个aware接口
*/
public class WebMvcConfigurationSupport implements ApplicationContextAware, ServletContextAware {
//================= 来自 XxxAware 接口的方法 =================
@Override
public void setApplicationContext(@Nullable ApplicationContext applicationContext) {
this.applicationContext = applicationContext;
}
@Override
public void setServletContext(@Nullable ServletContext servletContext) {
this.servletContext = servletContext;
}
//================= @Bean 方法,向spring中添加 bean =================
@Bean
public RequestMappingHandlerMapping requestMappingHandlerMapping(...) {
RequestMappingHandlerMapping mapping = createRequestMappingHandlerMapping();
mapping.setOrder(0);
// getInterceptors(...) 获取 interceptors,往下看
mapping.setInterceptors(getInterceptors(conversionService, resourceUrlProvider));
mapping.setContentNegotiationManager(contentNegotiationManager);
// getCorsConfigurations(...) 获取Cors配置,往下看
mapping.setCorsConfigurations(getCorsConfigurations());
// getPathMatchConfigurer(...) 获取PathMatch配置,往下看
PathMatchConfigurer configurer = getPathMatchConfigurer();
...
return mapping;
}
...
//================= get xxx 配置方法,添加spring提供的默认配置,添加自定义配置 =======
// 获取 interceptors
protected final Object[] getInterceptors(
FormattingConversionService mvcConversionService,
ResourceUrlProvider mvcResourceUrlProvider) {
if (this.interceptors == null) {
InterceptorRegistry registry = new InterceptorRegistry();
// 调用配置方法,添加 interceptor,往下看
addInterceptors(registry);
registry.addInterceptor(new ConversionServiceExposingInterceptor(mvcConversionService));
registry.addInterceptor(new ResourceUrlProviderExposingInterceptor(mvcResourceUrlProvider));
this.interceptors = registry.getInterceptors();
}
return this.interceptors.toArray();
}
// 获取Cors配置
protected final Map
if (this.corsConfigurations == null) {
CorsRegistry registry = new CorsRegistry();
// 调用配置方法,添加 CorsMapping,往下看
addCorsMappings(registry);
this.corsConfigurations = registry.getCorsConfigurations();
}
return this.corsConfigurations;
}
// 获取PathMatch配置
protected PathMatchConfigurer getPathMatchConfigurer() {
if (this.pathMatchConfigurer == null) {
this.pathMatchConfigurer = new PathMatchConfigurer();
configurePathMatch(this.pathMatchConfigurer);
}
return this.pathMatchConfigurer;
}
...
//================= 配置方法,留待子类实现 =================
// 添加自定义 Interceptor,待子类实现
protected void addInterceptors(InterceptorRegistry registry) {
}
// 添加自定义 CorsMapping,待子类实现
protected void addCorsMappings(CorsRegistry registry) {
}
// 配置自定义 PathMatch
protected void configurePathMatch(PathMatchConfigurer configurer) {
}
...
}
```
可以看到,这个类的方法分为四类:
* 来自 `XxxAware` 的方法:`XxxAware` 接口由 spring 提供,bean 初始化完成时处理回调;
* 有 `@Bean` 注解的方法:往 spring 中添加 bean,生成 bean 时会调用 `getXxx` 方法;
* `getXxx` 方法:获取配置方法,在该方法中,会添加 spring 提供的默认配置,以及调用 `addXxx/configureXxx` 方法添加自定义配置;
* `addXxx/configureXxx` 方法:由子类实现,可以向 springmvc 中添加自定义配置。
这里总结下这 4 个类的关系:

理清了这四个类的关系,`@EnableWebMvc` 的执行流程就一目了然了,这里总结如下:
1. `@EnableWebMvc` 向 spring 容器中引入了` DelegatingWebMvcConfiguration`;
2. `DelegatingWebMvcConfiguration` 中有包含 `@Autowired` 注解的方法 `setConfigurers(List
3. `DelegatingWebMvcConfiguration` 继承了 `WebMvcConfigurationSupport`,在 spring bean 的周期中会处理 `WebMvcConfigurationSupport` 中有 `@Bean` 注解的方法,这种方法比较多,如 `requestMappingHandlerMapping()`、`mvcPathMatcher` 等,这些都是 smvc 的功能组件;
4. 在处理 `WebMvcConfigurationSupport` 中有 `@Bean` 注解的方法时,会调用 `getXxx()` 获取相关配置,该配置包括 spring 提供的默认配置及自定义配置,`getXxx()` 由 `WebMvcConfigurationSupport` 提供;
5. 在调用 `WebMvcConfigurationSupport#getXxx()` 获取自定义配置时,会调用 `addXxx()/configureXxx()`,该方法在 `WebMvcConfigurationSupport` 中是空方法,具体休逻辑由子类 (也就是` DelegatingWebMvcConfiguration`) 提供,最终调用方式是**遍历执行第 2 步获取的 `WebMvcConfigurer` 的 `addXxx()/configureXxx()`**;
整个流程如下图所示:

在启用 springmvc 功能,并添加自定义配置时,我们可以这么做:
1. 方式 1:使用 @EnableWebMvc 注解启用 mvc 功能,实现 WebMvcConfigurer,添加自定义配置
```
// 使用@EnableWebMvc注解启用mvc功能
@Component
@EnableWebMvc
public class MvcConfig {
...
}
// 实现 WebMvcConfigurer,添加自定义配置
@Component
public class MyWebMvcConfigurer implements WebMvcConfigurer {
// 重写WebMvcConfigurer方法,处理自定义配置
}
```
2. 方式 2:实现 `WebMvcConfigurationSupport` 类,重写其中的配置方法
```
@Component
public class MyWebMvcConfigurationSupport extends WebMvcConfigurationSupport {
// 重写配置方法,处理自定义配置
}
```
不过采用这种方式后,再实现 `WebMvcConfigurer` 添加自定义配置就不生效了,自定义配置只能在 `WebMvcConfigurationSupport` 进行配置。
springmvc 提供了哪些配置项呢?我们来看看 `WebMvcConfigurer` 提供的方法:
* `configurePathMatch`:配置路由请求规则
* `configureContentNegotiation`:内容协商配置
* `configureAsyncSupport`:
* `configureDefaultServletHandling`:默认静态资源处理器
* `addFormatters`:注册自定义转化器
* `addInterceptors`:拦截器配置
* `addResourceHandlers`:资源处理
* `addCorsMappings`:CORS 配置
* `addViewControllers`:视图跳转控制器
* `configureViewResolvers`:配置视图解析
* `addArgumentResolvers`:添加自定义方法参数处理器
* `addReturnValueHandlers`:添加自定义返回结果处理器
* `configureMessageConverters`:配置消息转换器。重载会覆盖默认注册的 `HttpMessageConverter`
* `extendMessageConverters`:配置消息转换器。仅添加一个自定义的 `HttpMessageConverter`.
* `configureHandlerExceptionResolvers`:配置异常转换器
* `extendHandlerExceptionResolvers`:添加异常转化器
* `getValidator`:
* `getMessageCodesResolver`:
如果需要配置相关项,只需要重写相关方法 即可。
最后我们再来看看 `WebMvcConfigurationSupport` 中引入了哪些 Bean,有 `@Bean` 注解的方法如下:
* `public RequestMappingHandlerMapping requestMappingHandlerMapping(...)`
* `public PathMatcher mvcPathMatcher()`
* `public UrlPathHelper mvcUrlPathHelper()`
* `public ContentNegotiationManager mvcContentNegotiationManager()`
* `public HandlerMapping viewControllerHandlerMapping(...)`
* `public BeanNameUrlHandlerMapping beanNameHandlerMapping(...)`
* `public RouterFunctionMapping routerFunctionMapping(...)`
* `public HandlerMapping resourceHandlerMapping(...)`
* `ResourceUrlProvider mvcResourceUrlProvider()`
* `public HandlerMapping defaultServletHandlerMapping()`
* `public RequestMappingHandlerAdapter requestMappingHandlerAdapter(...)`
* `public HandlerFunctionAdapter handlerFunctionAdapter()`
* `public FormattingConversionService mvcConversionService()`
* `public Validator mvcValidator()`
* `public CompositeUriComponentsContributor mvcUriComponentsContributor(...)`
* `public HttpRequestHandlerAdapter httpRequestHandlerAdapter()`
* `public SimpleControllerHandlerAdapter simpleControllerHandlerAdapter()`
* `public HandlerExceptionResolver handlerExceptionResolver(...)`
* `public ViewResolver mvcViewResolver(...)`
* `HandlerMappingIntrospector mvcHandlerMappingIntrospector()`
这些都是 springmvc 中用到的一些组件,具体的具体内容就不展开了。
### 4\. 总结
本文内容比较杂,先提供了一个 springmvc 的 demo,然后介绍了 demo 中 `0 xml` 配置原理 (也就是 `servlet 3.0` 规范),接着介绍了 `@EnableWebMvc` 的功能,着重介绍了 `WebMvcConfigurationSupport` 的作用。
* * *
_本文原文链接:[https://my.oschina.net/funcy/blog/4696657](https://my.oschina.net/funcy/blog/4696657) ,限于作者个人水平,文中难免有错误之处,欢迎指正!原创不易,商业转载请联系作者获得授权,非商业转载请注明出处。_
点赞
回复
X